Disasters strike when we least expect them. You might feel panicked and overwhelmed. But you must stay calm. Your actions now determine your payout. Knowing how to document damage for an insurance claim is critical. It helps you get every penny you deserve. We will guide you through this process. You do not have to do this alone. Let’s secure your financial future together.
Why Documentation Matters So Much
Think of your claim as a court case. You are the lawyer for your home. Evidence is the only thing that matters. Without proof, the insurance company will guess. They often guess low to save money.
You need undeniable proof of your loss. Detailed records prevent disputes later on. They speed up the approval process significantly. You want your check fast, right? Then you must be thorough today.
“In the world of insurance, if it isn’t documented, it didn’t happen.”
Phase 1: Safety and Mitigation First
Stop the Damage
Your safety is the number one priority. Do not enter a dangerous building. Wait for the fire department’s approval. Once safe, you must stop further damage.
This is called “mitigating the loss.” It is a requirement in most policies. If a pipe bursts, turn off the water. If the roof leaks, cover it up.
Keep Mitigation Receipts
Did you buy a tarp? Did you buy plywood to board windows? Keep those receipts safe. The insurance company should reimburse you. Do not throw these small costs away. They add up to big money.
Phase 2: Your Documentation Toolkit
You need the right tools for the job. You probably have them already. Do not overcomplicate this part.
The Essentials Grid:
| Tool | Why You Need It |
|---|---|
| Smartphone | For high-quality photos and video. |
| Tape Measure | To show the scale of the damage. |
| Notebook | To write down thoughts and timelines. |
| Flashlight | To illuminate dark corners and attics. |
| Cloud Storage | To back up evidence instantly. |
Having these ready saves you time. You will not have to search later. Keep a charger handy as well. Taking photos drains your battery quickly.
Phase 3: Mastering the Photo Evidence
The Wide Angle Shot
Start from the outside of the property. Take a photo of the street sign. Photograph your mailbox or house number. This proves the location of the damage.
Stand back and get the whole room. We need to see the layout. Take photos from all four corners. This establishes the context of the scene.
The Mid-Range Shot
Now step closer to the damage. Photograph the specific wall or furniture item. Show its relationship to the room. Is the sofa near the wet window? Show that connection clearly in the frame.
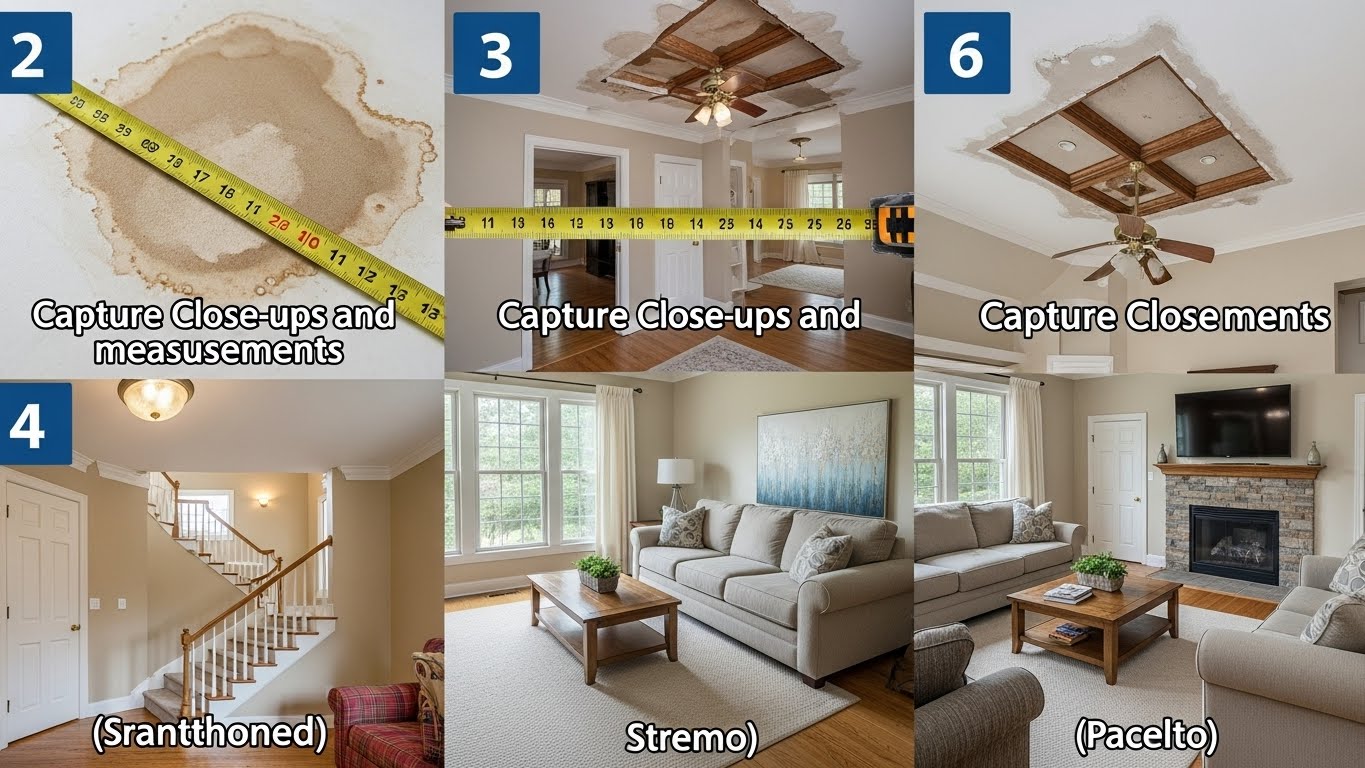
The Close-Up Detail
This is where you prove the value. Get close to the texture. Show the mold on the drywall. Show the brand name on the electronics. Capture the serial number on the back. These details prove the item’s worth.
Use Reference Objects
Damage can look smaller in photos. Use a coin or pen for scale. Place a tape measure next to the hole. This shows the adjuster the exact size. It prevents them from underestimating the repair.
Phase 4: Shooting Video Walkthroughs
Narrate Your Story
Photos are great, but video is better. Switch your phone to video mode. Start walking through the damaged area. Speak out loud while you record.
Describe what you are seeing. “I am standing in the kitchen. The water is two inches deep.” This audio log helps the adjuster. It also helps you remember details later.
Open Drawers and Closets
Do not just film the outside. Open your kitchen drawers slowly. Show the water inside the cabinets. Open the closet doors in the bedroom. Show the wet shoes on the floor.
Hidden damage is often the most expensive. You must look for it actively. Film everything you find.

Phase 5: Building the Written Inventory
Create a Master List
You cannot rely on memory alone. You will forget things due to stress. Open a spreadsheet or use a notebook. You must list every single damaged item.
Sample Inventory Table:
| Item Description | Age | Original Cost | Condition |
|---|---|---|---|
| Samsung 55″ TV | 2 Years | $800 | Destroyed |
| Leather Sofa | 4 Years | $1,200 | Water Stained |
| Wool Area Rug | 1 Year | $300 | Moldy |
| Nike Running Shoes | 6 Months | $120 | Ruined |
Gather Your Proof of Purchase
Do you have the original receipts? That is the gold standard. If not, check your email. Search for order confirmations from Amazon. Look for credit card statements online.
Bank statements can also serve as proof. They show when and where you bought it. This helps establish the item’s age. Age determines the “Actual Cash Value.”
Handling Gifts and Heirlooms
What if you didn’t buy it? You still have coverage for gifts. Find a photo of you with the item. This proves you owned it.
For antiques, you might need an appraisal. Did you insure it separately? Check your policy specifically for high-value items.
Phase 6: Specific Scenarios
Auto Accident Documentation
Cars require a different approach. Photograph all four corners of the car. Photograph the other driver’s license plate. Get a picture of their insurance card.
Take photos of the road conditions. Was it raining or snowing? Are there skid marks on the road? Photograph the traffic signs nearby. These details help determine who was at fault.
Natural Disasters (Storms/Floods)
Flood water leaves a line. Photograph the “high water mark” on walls. This proves how high the water rose. It distinguishes flood damage from rain damage.
For wind damage, look at the roof. Look for missing shingles in the yard. Photograph tree limbs down on the structure. This proves the cause was wind.
Theft and Burglary
This is harder to document. You are documenting an absence. Photograph the broken door or window. This proves forced entry occurred.
Find photos of the room before the theft. Show where the TV used to be. Locate the empty jewelry box. Police reports are vital here. You must file one immediately.
Phase 7: Digital Organization
Create a Digital Folder
Do not leave photos in your camera roll. They get lost among personal pictures. Create a specific folder in Google Drive. Name it “Insurance Claim [Year].”
Upload everything immediately. Phones can break or get lost. Cloud storage protects your evidence. You can share the link easily.
Naming Your Files
Rename your photos if you can. “Living Room Water Damage 1” is helpful. “IMG_4453.JPG” is not helpful to anyone.
Organized files make the adjuster happy. A happy adjuster works faster. They will appreciate your effort. It builds trust in your claim.
Phase 8: Working with the Adjuster
The First Visit
The adjuster will come to your house. You should walk with them. Do not let them walk alone. Point out the damage you documented.
Show them your photos and videos. They might miss something. You know your home best. Be polite but be assertive.
Sharing Your Evidence
You can email them your inventory. You can send a link to your photos. Ask them how they prefer it.
Keep a log of all conversations. Who did you speak to? What date and time was it? What did they promise you? Write it all down.
External Resources
For more on policy types, check the Insurance Information Institute. They have great guides.
Also, FEMA offers tips for disaster recovery. These sites are very trustworthy.
Phase 9: Common Mistakes to Avoid
Mistake 1: Throwing Things Away
Never throw damaged items away early. The adjuster needs to see them. Even a burnt couch is evidence. Keep them in the garage or yard.
Mistake 2: Cleaning Too Soon
We want our homes clean. But cleaning removes evidence. Do not scrub the soot off walls. Do not vacuum the glass shards yet. Take the photos first.
Mistake 3: Signing too Quickly
Do not sign the first settlement offer. It is often too low. Review your documentation again. Does the offer cover everything? If not, show your proof again.
Claim Success Chart:
- Documented Claims: High Payout / Fast Approval
- Undocumented Claims: Low Payout / High Rejection Risk
- Partial Documentation: Delayed Payout / Disputes
Phase 10: Dealing with Contractors
Get Multiple Estimates
Do not just hire the first guy. Get at least three written estimates. They should be detailed.
The estimate should list materials and labor. It should match your own documentation. If a contractor sees more damage, document it. Add it to your claim.
The “Scope of Work”
Ensure the contractor and adjuster agree. They must agree on the “Scope of Work.” This is the list of repairs needed.
If they disagree, you mediate. Use your photos to break the tie. Your evidence is the ultimate truth.
Phase 11: Advanced Documentation Tips
Tracking Living Expenses
Did you have to move out? This is “Loss of Use.” Keep receipts for the hotel. Keep receipts for restaurant meals.
You usually spend less on groceries. Eating out costs more. The insurance covers the difference. You must prove these extra costs.
documenting Lost Wages
Did you miss work to handle this? Some policies cover lost time. Ask your agent about this. You will need a letter from your boss.
Updates and Revisions
You will find more damage later. This is normal. It is called a “supplement.” Contact the adjuster immediately.
Take new photos of the new find. Add it to your inventory list. Do not wait until the end. Keep the communication flowing.
Conclusion
We know this feels like a lot of work. It is tedious and tiring. But remember why you are doing it. You are protecting your financial health.
Learning how to document damage for an insurance claim is a skill. It is a skill that pays off. You are now prepared. You have the tools. You have the knowledge.
Take a deep breath. Go step by step. Focus on one room at a time. You will get through this. We believe in you.
Frequently Asked Questions (FAQs)
1. Can I take photos with just my phone?
Yes, modern phones are perfect. Just ensure the lighting is good.
2. Should I throw away wet carpet immediately?
No, keep a sample piece. The adjuster needs to see the quality.
3. What if I don’t have receipts for everything?
Use photos, manuals, or bank statements. Affidavits can also help.
4. How long do I have to file a claim?
It varies by policy. Usually, you must file as soon as possible.
5. Can I start repairs before the adjuster comes?
Only do emergency repairs. Stop leaks, but delay permanent fixes.